Material主题
静态博客 Hexo material 主题安装
注意,这里介绍的 Material 主题是 1.5.2 的版本
如果你还没有安装 Hexo,并且对它有兴趣,请前往 EasyHexo
这里将提供 Hexo 安装相关的一系列指导和其他非常棒的主题和插件
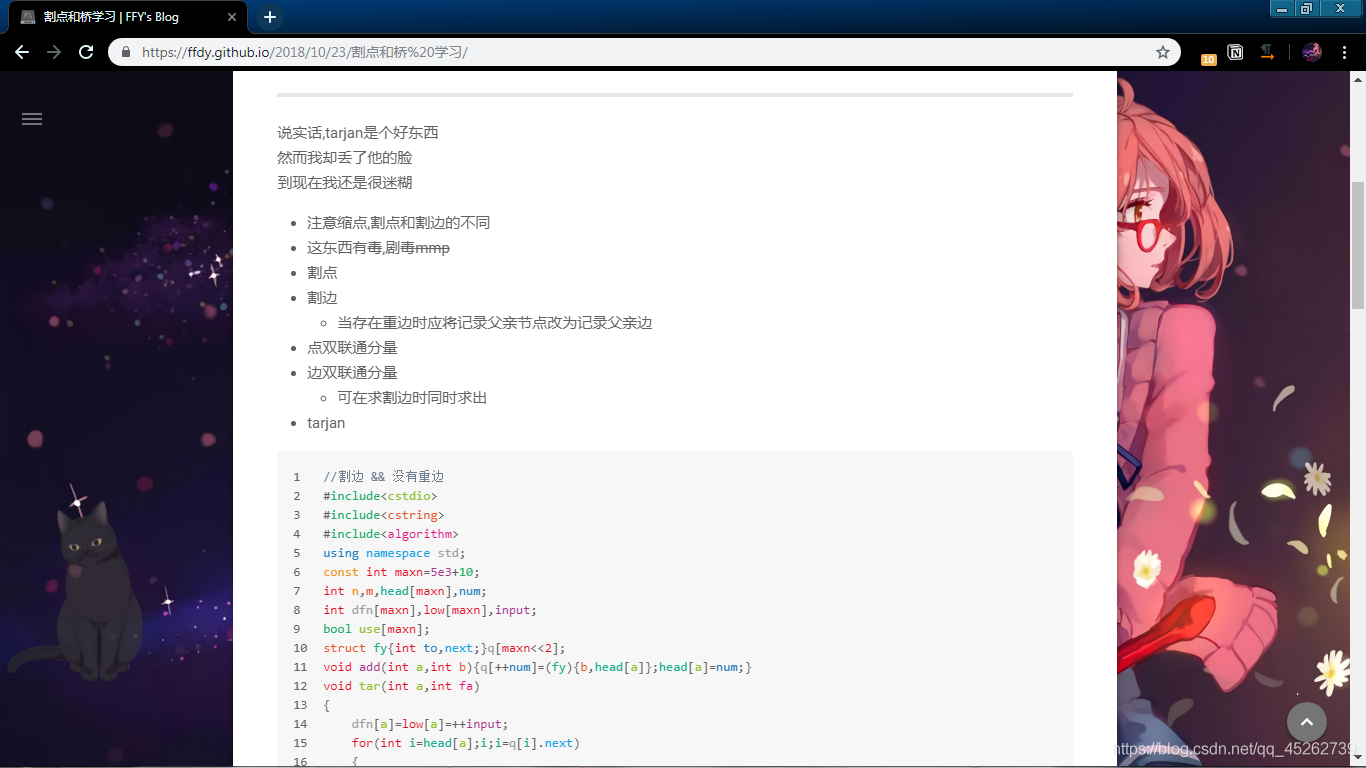
Material 主题演示
查看官方样式请前往 https://github.com/viosey/hexo-theme-material
以下仅为博主个人的博客样式,更多更好玩的请自行探索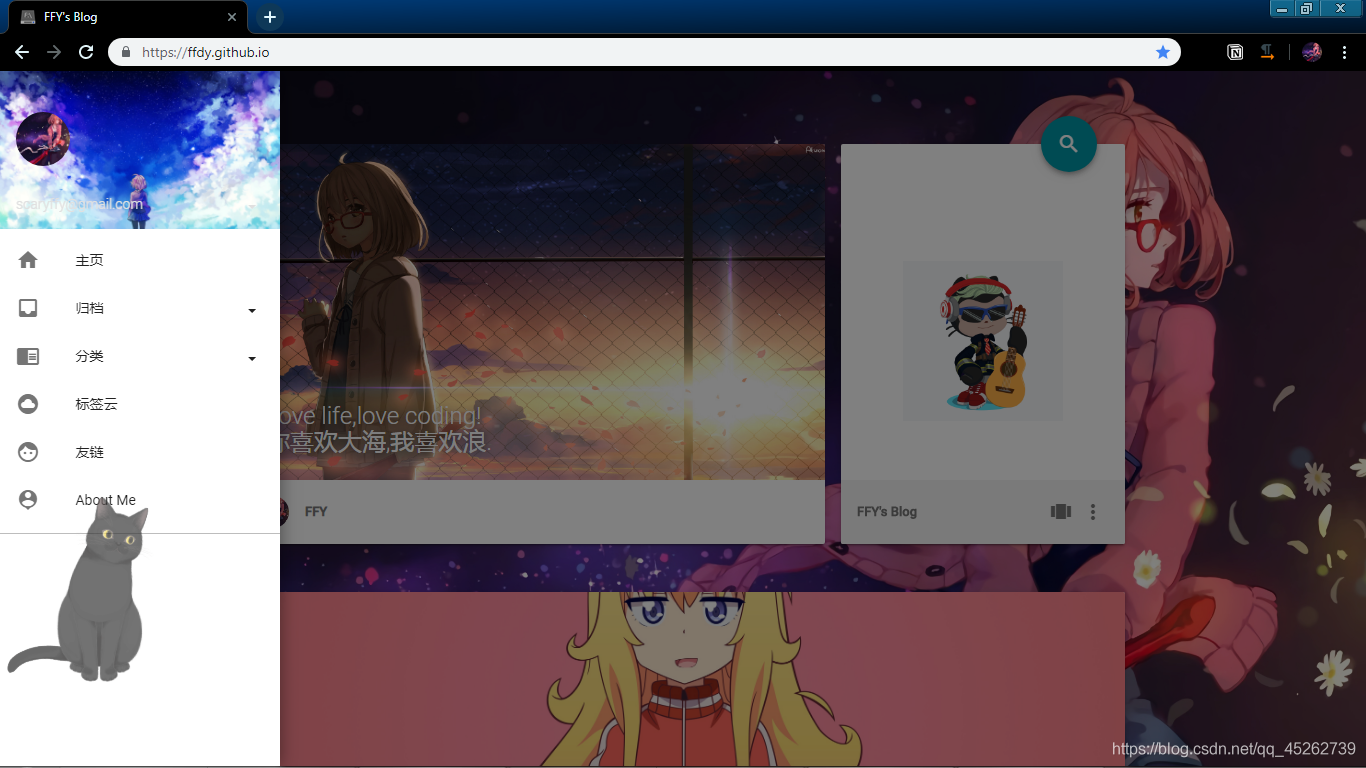
下载 Material 主题
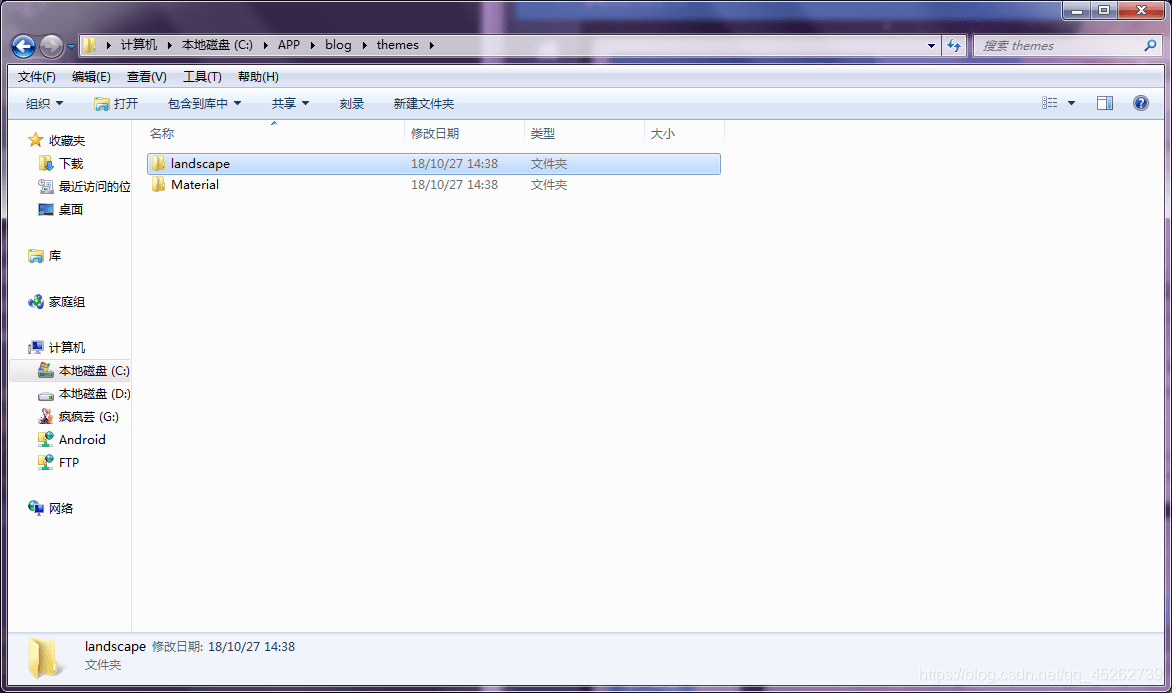
进入 Github,下载 Material 主题 1.5.2 的版本。
将下载下来的主题解压,将解压的文件夹重命名为
Material。将这个文件夹放到你的博客根目录下的 themes 文件夹下。
启用 Material 主题
这里有两个
_config.yml文件,一个位于博客根目录,另一个位于主题文件夹下,下面分别叫他们根 _config.yml文件和主题 _config.yml文件。
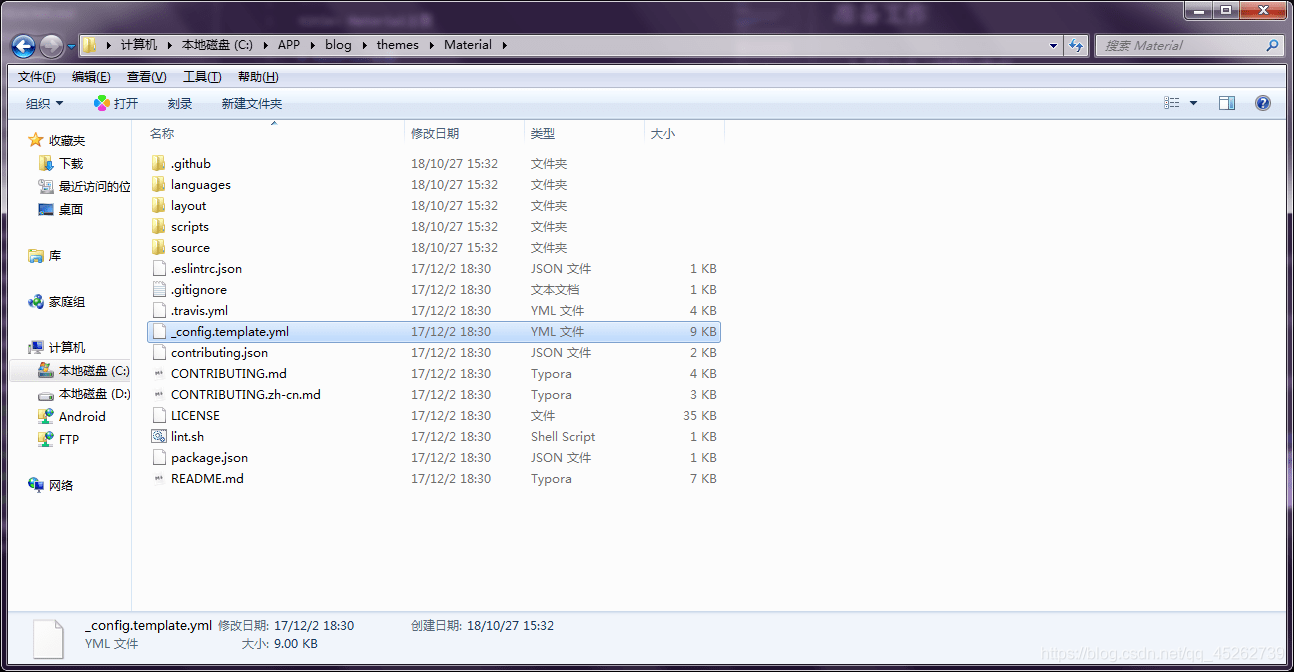
进入 Material 文件夹,将 _config.template.yml 重命名为 _config.yml
(这个 _config.yml 文件是 主题 _config.yml 文件)
建议你将
_config.template.yml文件备份,防止一些不可描述的的问题。
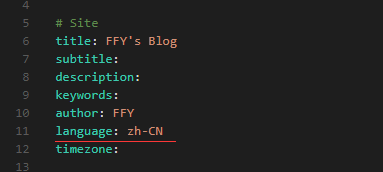
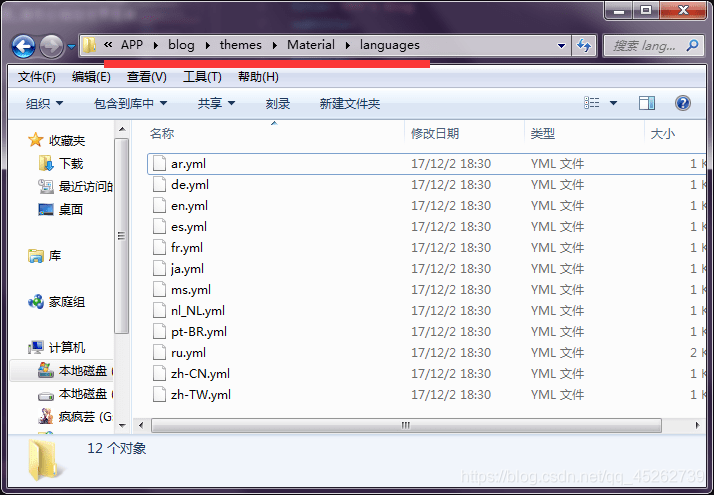
回到主题根目录,用文本编辑器打开根_config.yml文件,找到language属性。(我用的简体中文)
有以下几项可选:
- العَرَبِيََّّة (ar)
- Deutsch(de)
- English(en)
- Español(es)
- Français(fr)
- 日本語(ja)
- Malay(ms)
- Portuguese(Brazil)(pt-BR)
- 简体中文(zh-CN)
- 繁體中文(zh-TW)
分别对应 language 文件下的文件
在最下面找到 theme 属性
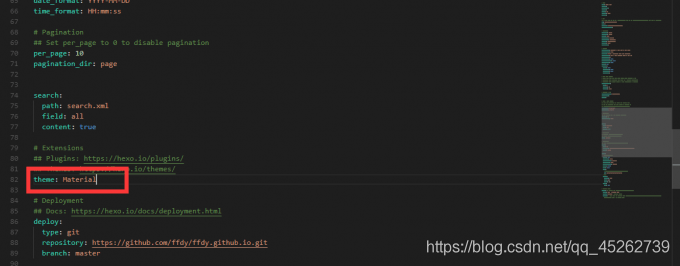
将后面的字段改为你刚刚改的主题文件夹的名字,比如我的 Material。
在 yml 中,冒号后面必须加一个空格,否则会报错。
OK,Material 主题就正式启用了下面,就是见证奇迹的时候了,有没有一点小激动呢?
回到博客根目录,打开终端,输入:
$ hexo clean
回车
完美!!!:tada:
好,再输入:
$ hexo g
回车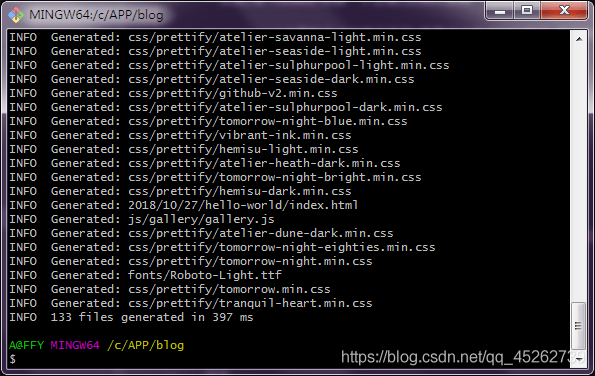
完全OK!!!:tada:
输入:
$ hexo s
回车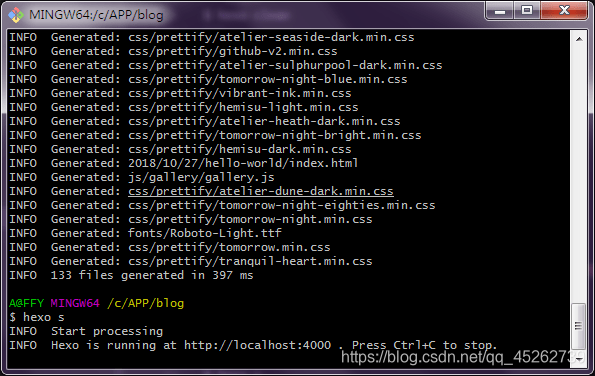
打开浏览器输入 http://localhost:4000,即可看见你博客的样子。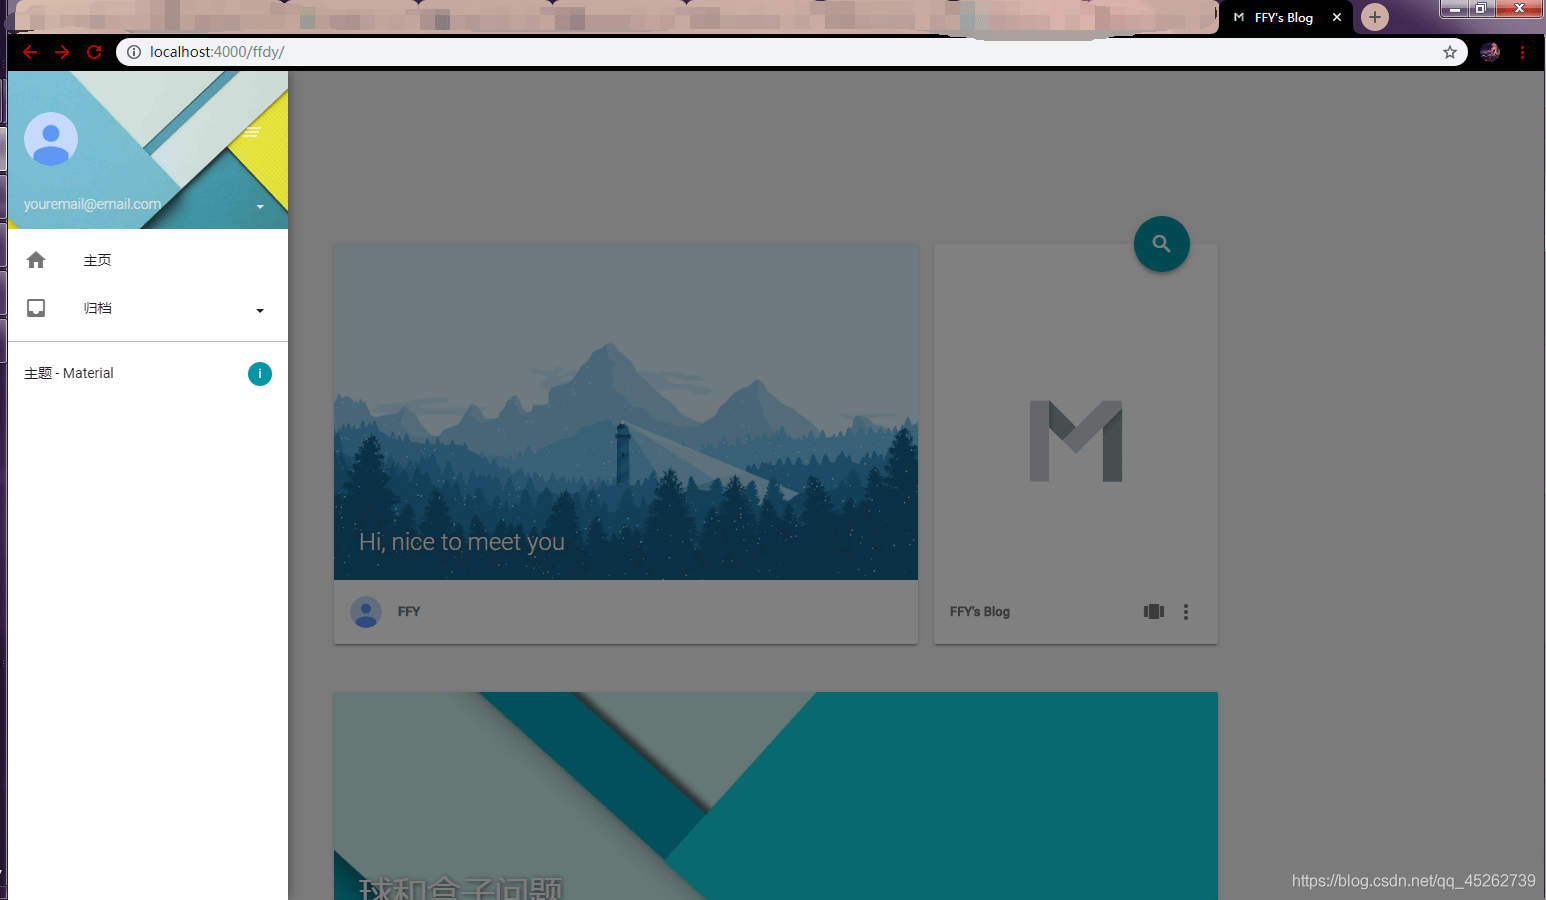
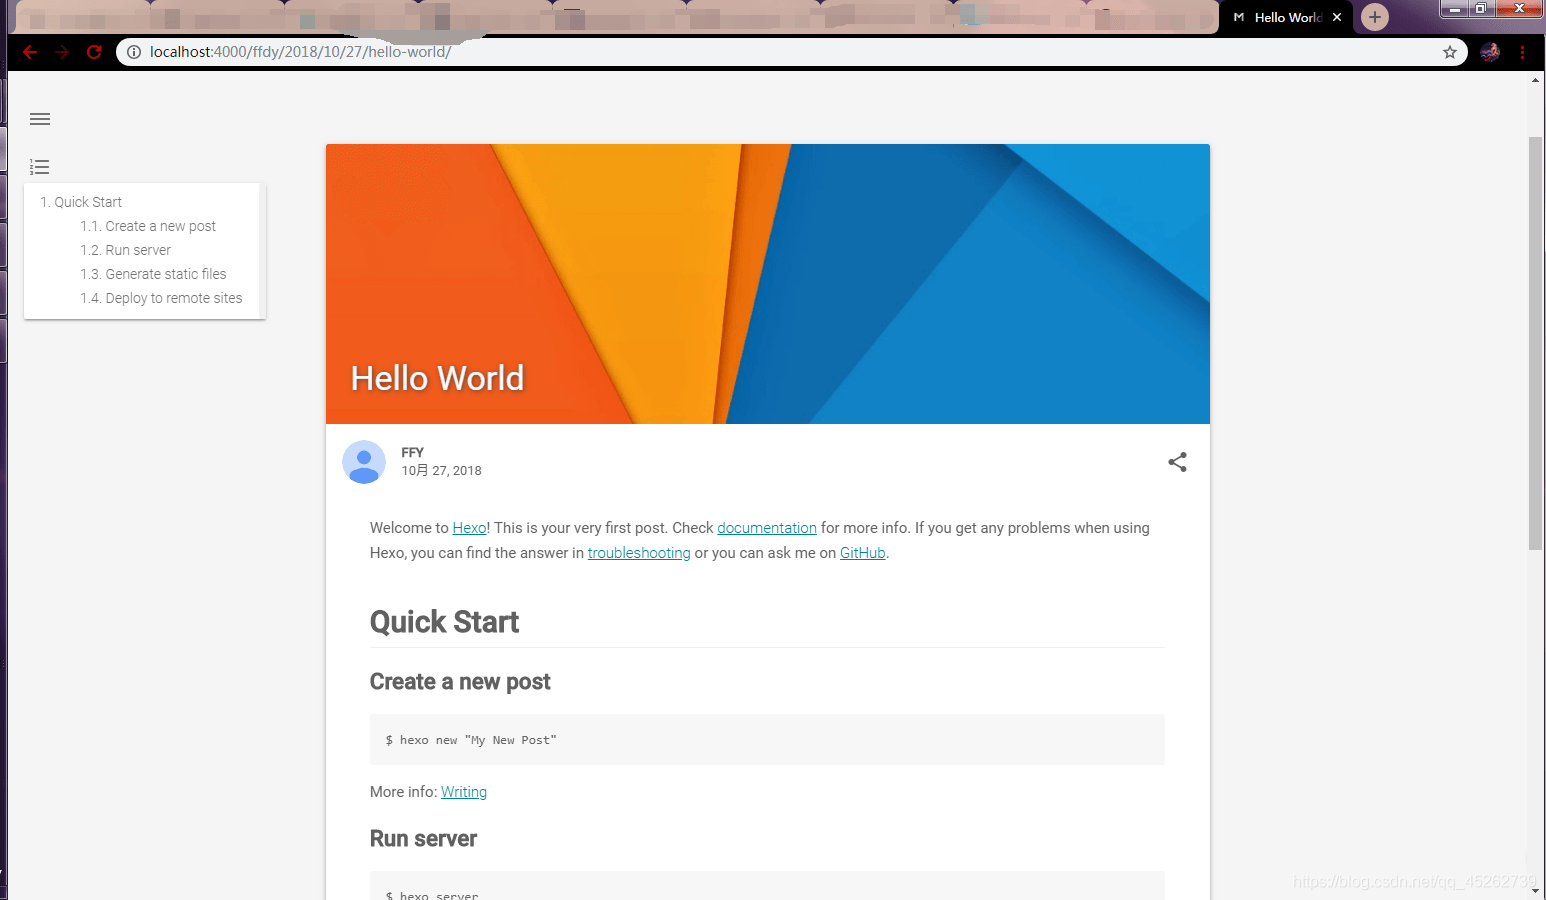
点篇文章试试,如果没问题,那么恭喜你!
:tada: :tada: :tada: :tada:
Material 主题配置
附录有原版 主题 _config.yml代码,防止出现问题。
回到主题文件夹,打开 主题 _config.yml文件
看起来是不是又臭又长?不过别担心,下面会详细的讲解他们应该怎样配置
请多一点耐心和细心
一、基本设置
1、博客的网站图标
# Head info
head:
    favicon: "/img/favicon.png" #正常网站图标
    high_res_favicon: "/img/favicon.png" #高清图标
    apple_touch_icon: "/img/favicon.png" #IOS主屏按钮图标

进入主题文件下的 source/img 文件夹,将 favicon.png 替换成你的网站图标,名字可以自定义,但必须和主题配置文件中的保持一致,比如我的图标名为 F.png: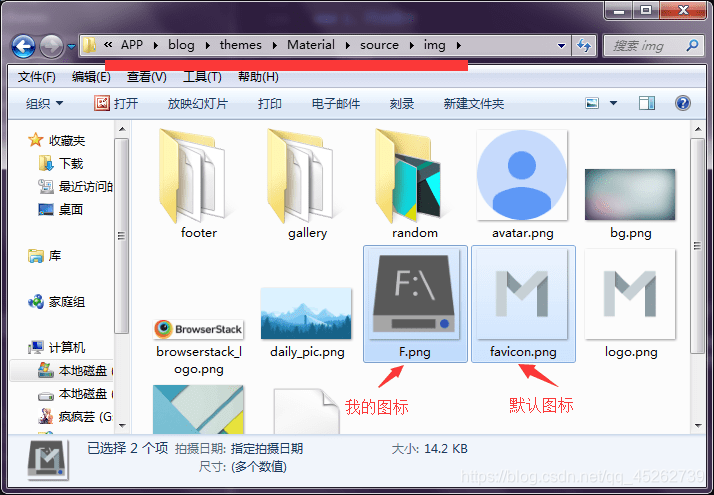
    favicon: "/img/F.png" #正常网站图标
    high_res_favicon: "/img/F.png" #高清图标
    apple_touch_icon: "/img/F.png" #IOS主屏按钮图标
2、优化 SEO
这个设置启用后会在页面的 Head 中生成结构化数据,有助于改善 Google 等搜索引擎的 SEO 。
如果你在 hexo g时出现问题,不妨尝试将其设为 false
    # Enable generate structured-data as JSON+LD for SEO or not.
    #    Set as 'false' if it cause some wrong when `hexo g`.
    structured_data: true #就是这个
3、跳转链接
# Jump Links Settings
url:
    rss: #设置生成的 rss 或 atom 链接
    daily_pic: "#" #设置点击 daily_pic 模块时跳转的链接
    logo: "#" #设置点击 logo 时跳转的链接
二、样式和主题
1、主体的样式
# Schemes
scheme: Paradox #默认样式
#scheme: Isolation #极简样式
默认样式就像上面的演示
极简样式像这样的:
去除了隐藏侧边栏和文章的随机图片等功能,十分简洁
2、标语和板块背景色
# UI & UX: slogan, color, effect
uiux:
    slogan: "Hi, nice to meet you" #标语
    theme_color: "#0097A7" #主题主要颜色,博客的大部分地方使用此颜色
    theme_sub_color: "#00838F" #主题的辅助色
    hyperlink_color: "#00838F" #超链接的颜色
    button_color: "#757575" #按钮颜色,比如菜单按键和回到顶部按键
    android_chrome_color: "#0097A7" #Android上Chrome的地址栏颜色
    nprogress_color: "#29d" #顶部加载进度条颜色
    nprogress_buffer: "800" #精度条的缓冲时间
3、页面的 Js 效果
# JS Effect Switches
js_effect:
    fade: true #页面加载时部分模块的渐显效果
    smoothscroll: false #页面平滑滚动特效
4、文章摘要字数
# Reading experience
reading:
    entry_excerpt: 80 #首页文章摘要字数
5、文章缩略图
# Thumbnail Settings
thumbnail:
    purecolor: #这里填入颜色代码,如果文章无缩略图,缩略图区域显示该颜色
    random_amount: 19 #缩略图的数量,如果你要自定义,请改为你的图片数
Material 主题提供了 19 张简约图,如果你的文章没有定义缩略图,主题就会从随机图库中随机取一张图。
如果随机图库中没有图片,那么该区域会显示你设置的颜色。
如果你也没有设置颜色,则会显示你的主题色。
主题默认支持 .png 格式的缩略图,并且只支持 .png 的缩略图,命名格式还必须是 Material-XX.png。
好吧,这看起来好像很坑,但它好在是开源的,可以自己动手修改
进入 themes/Material/layout/_partial 文件夹,找到 Paradox-post_entry-thumbnail.ejs 和 Paradox-post-thumbnail.ejs 两个文件,用文本编辑器打开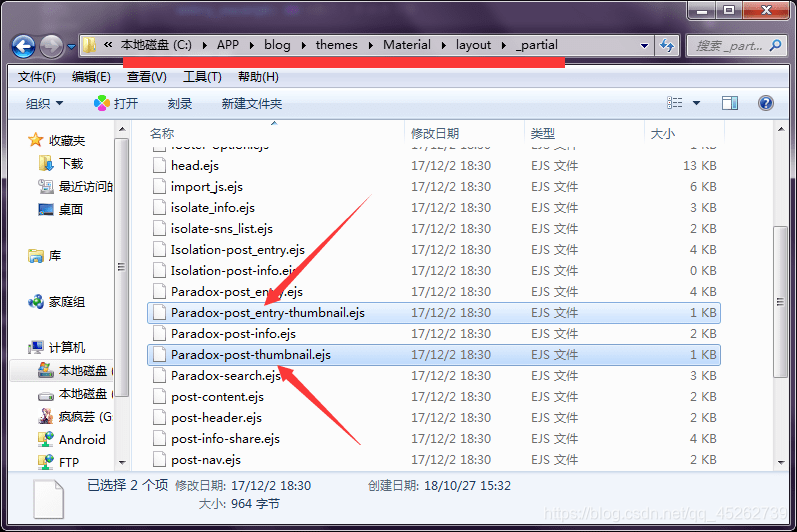
如果你想用其他格式的图片,你可以 Ctrl+f 搜索 .png, 把如图位置的字段改为你想使用的格式(推荐使用 .jpg 格式,比较小,加载较快):
Paradox-post_entry-thumbnail.ejs 文件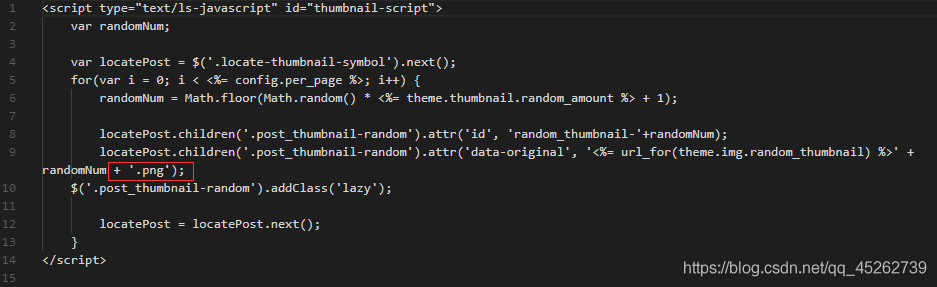
Paradox-post-thumbnail.ejs 文件
这种方法只能同时使用同种格式的图片,如果你想用不同格式的图,请自行尝试 if-else 语法,也有很多软件可以批量改格式,比如格式工厂
那么现在又有一个问题,我现在有 192 张图,每一张图都要命名成 Material-xx.png 的格式,如果一张一张的重命名,岂不是要累趴下,有没有什么好的方法呢
答案是肯定的,你可以用相关软件,或者写一个批处理
这里介绍一个简单的方法— Windows 自带的文件重命名策略:
选中你想用的 n 张图
选择一个重命名,假设你输入了 Material,回车
你会发现这 n 张图的名字变成了 Material (x).jpg,x 为 1~n,并且括号前多了一个空格
这时我们还要修改一下相关配置,上面的两个文件相同的的位置改为:
Paradox-post-thumbnail.ejs 文件
Paradox-post_entry-thumbnail.ejs 文件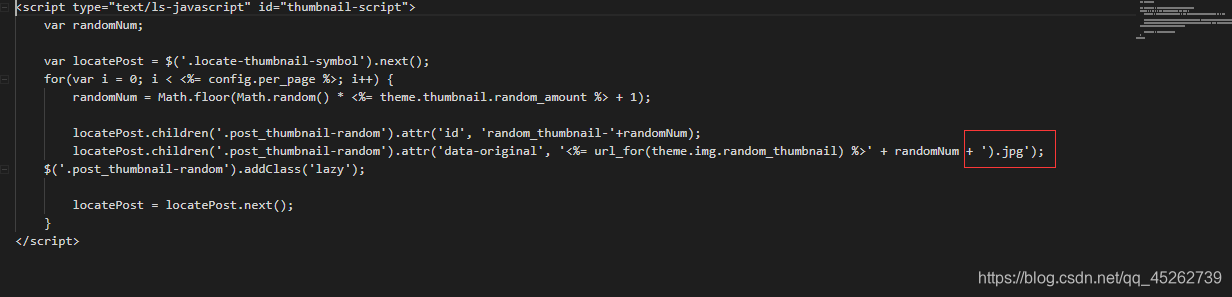
另外主题 _config.yml 文件 img 字段中改为: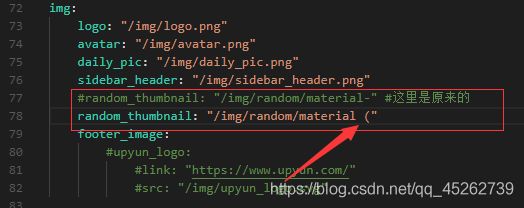
如果你按如上方法命名,箭头所指的空格一定要有。其他的命名方式大体一致。
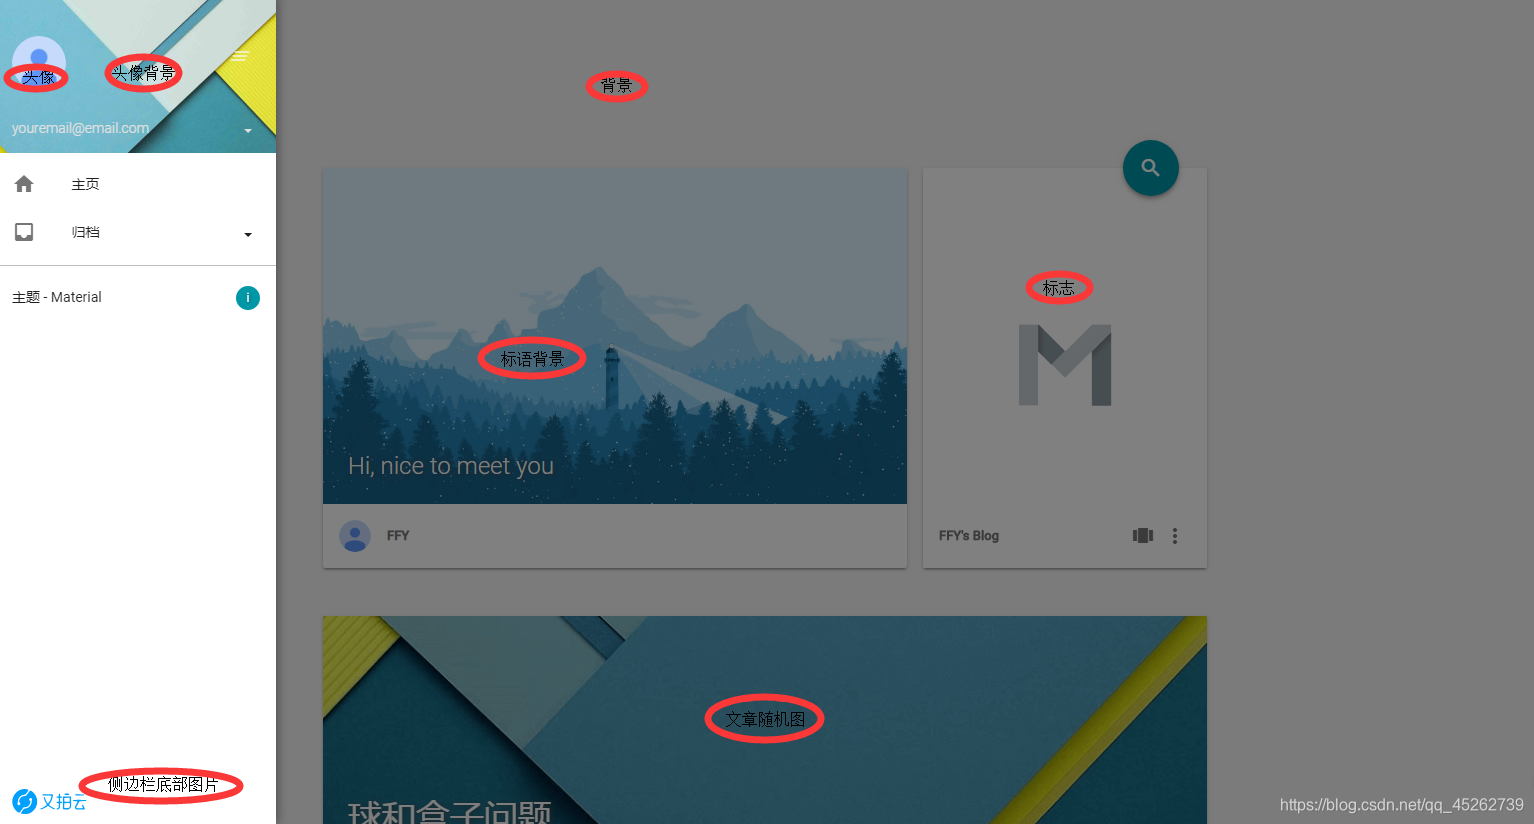
6、各种图片位置
# Images Settings
img:
    logo: "/img/logo.png" #标志
    avatar: "/img/avatar.png" #头像
    daily_pic: "/img/daily_pic.png" #标语背景
    sidebar_header: "/img/sidebar_header.png" #侧边栏头像背景
    #random_thumbnail: "/img/random/material-" #这里是原来的
    random_thumbnail: "/img/random/material (" #文章随机缩略图
    footer_image: #侧边栏底部图片
        upyun_logo: #以又拍云为例
            link: "https://www.upyun.com/" #点击链接
            src: "/img/upyun_logo.svg" #图标
这里所有的图片均放在 themes/Material/source/img ,你可以替换它们,并将如上配置相应改变。
文章随机缩略图按上一栏配置
7、字体
# Custom Fonts
#    family: the font-family which will be used in the theme
#    use: uri of fonts host.
#        Available value: google | baomitu | ustc | custom | catnet
#        - When you set as 'custom', you should fill in the value of 'custom_font_host', which should be a mirror of google fonts.
#        - If you have setup your custom font-family, don't forget to add style tag with @font-face or link.tag with font css
#          to /source/data/head.yml as custom code, to load custom font files.
fonts:
    family: Roboto, "Helvetica Neue", Helvetica, "PingFang SC", "Hiragino Sans GB", "Microsoft YaHei", "微软雅黑", Arial, sans-serif
    use: google
    custom_font_host:
8、文章卡片阴影
# Card Elevation Level
card_elevation: 2 #请自行改变数值
三、自定义设置
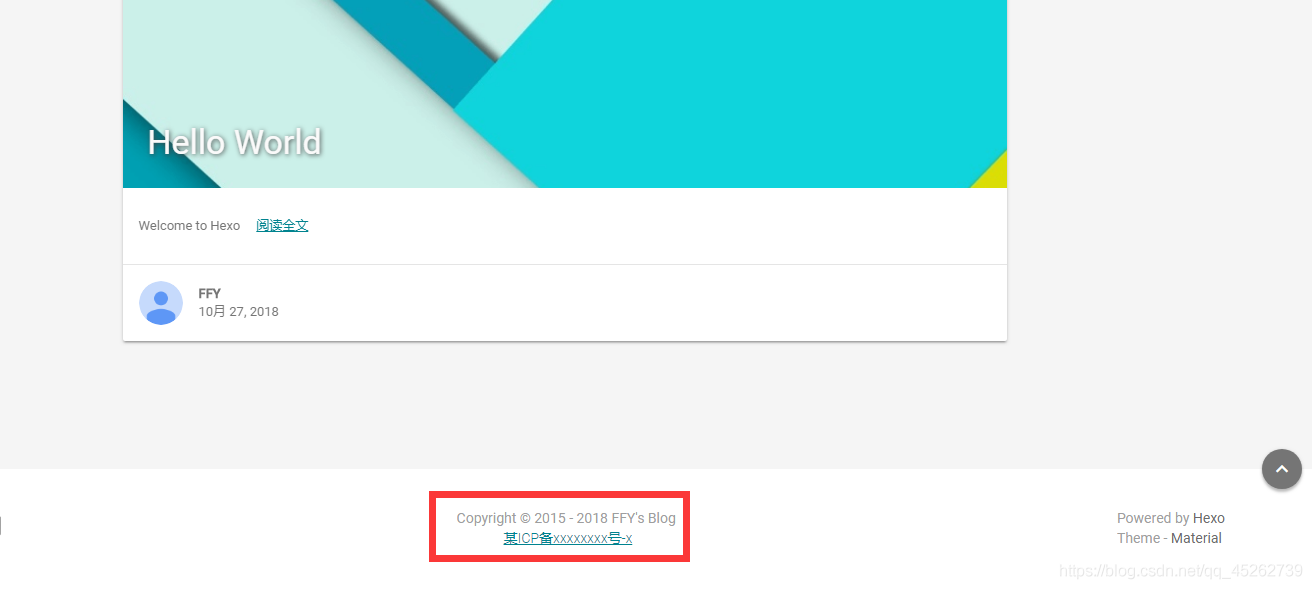
1、站点成立时间
# Copyright
# Specify the date when the site was setup.
#    For example, if you set it as 2015, then footer will show '© 2015 - 2018'
copyright_since: 2015
如果设为 2015,他会显示 © 2015 - 2018,如果不设,只会显示当前 2018 年
# Footer Text
# You can specify the text you want to show in footer, HTML tag is supported.
#   For example, you can setup ICP license number as:
#       '<a href="http://www.miitbeian.gov.cn" rel="nofollow">某ICP备xxxxxxxx号-x</a>'
footer_text: <a href="http://www.miitbeian.gov.cn" rel="nofollow">某ICP备xxxxxxxx号-x</a>
页底显示的信息格式应与上面的例子一样
2、二维码
# Qrcode for redirect at other device
#    use: choose which method to generate the qrcode for each posts.
#        Available value: plugin | online
#            - When use "plugin", you need to install the hexo-helper-qrcode.
#            - When use "online", the qrcode will be generated by 'pan.baidu.com' in China.
qrcode:
    enable: false #是否启用
    use: plugin #生成方式,可选的有:plugin | online
用于在文章页中显示二维码,扫描二维码即可直接打开文章。
当 use 设置为 plugin 时,你需要安装 hexo-helper-qrcode 插件,在博客根目录下打开 Git
$ npm install hexo-helper-qrcode --save
当 use 设置为 online 时,二维码将会由 pan.baidu.com 的 API 生成。
3、代码高亮
Material 主题提供了两种代码高亮:prettify | hanabi
启用前你需要吧根 _config.yml 文件中的代码高亮关闭,否则会产生冲突
highlight:
  enable: false #这里改为false
  line_number: false
  auto_detect: false
  tab_replace:
主题 _config.yml 文件如下:
# Code highlight
# You can only enable one of them to avoid issues.
# Also you need to disable highlight option in hexo's _config.yml.
#
#    Prettify
#        theme: # Available value in /source/css/prettify/[theme].min.css
prettify:
    enable: false #是否启用
    theme: "github-v2" #高亮主题,进入主题文件夹中  /source/css/prettify/[theme].min.css,填入其中的 [theme] 字段
#
#    Hanabi (https://github.com/egoist/hanabi)
#        line_number: [true/false] # Show line number for code block
#        includeDefaultColors: [true/false] # Use default hanabi colors
#        customColors: This value accept a string or am array to setting for hanabi colors.
#                    - If `includeDefaultColors` is true, this will append colors to the color pool
#                    - If `includeDefaultColors` is false, this will instead default color pool
hanabi:
    enable: true
    line_number: true #是否显示行数
    includeDefaultColors: true
    customColors: #可添加多种自定义颜色作为代码高亮主题,但请遵循 Yaml 的规范填写配置。
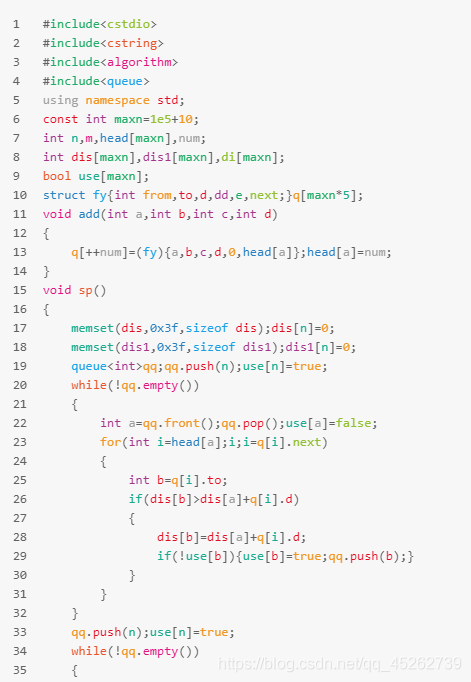
hanabi 默认效果( C++ 为例):
两种高亮只能开启一个
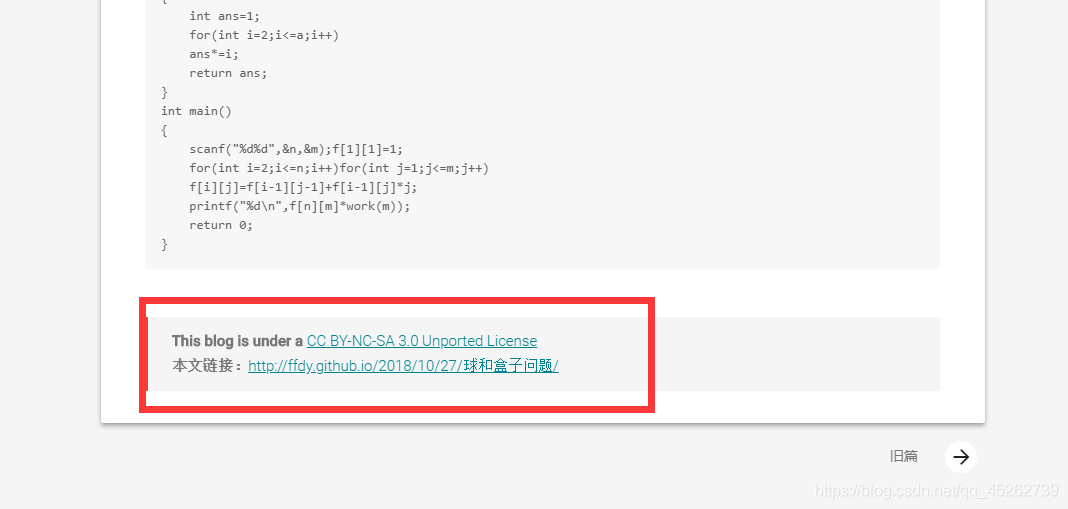
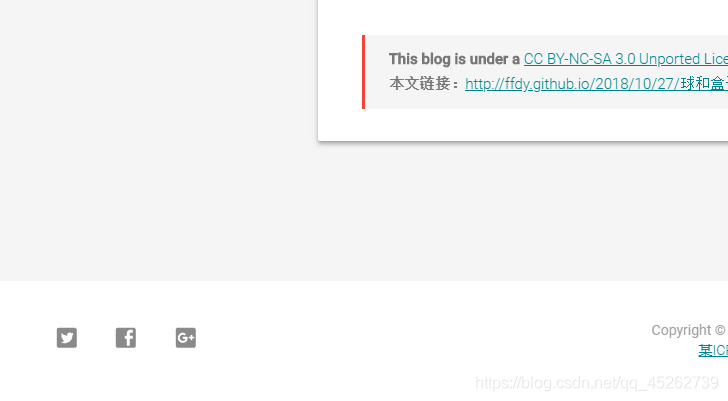
4、版权声明
你可以在每篇文章的结尾添加你的版权说明,支持 Html 标签。License 以粗体显示,默认为空。 比如,你可这样设定 CC License。
# Post License
# You can specify the text you want to show in the end of your posts and pages, HTML tag is supported.
#   For example, you can setup a CC license as:
#       'This blog is under a <a href="/creativecommons.html" target="_blank">CC BY-NC-SA 3.0 Unported License</a>'
# You can also use Front-Matter `license` to override this setting.
license: 'This blog is under a <a href="/creativecommons.html" target="_blank">CC BY-NC-SA 3.0 Unported License</a>'
你也可以在页面的 Front-Matter 中为不同文章添加不同的 License。
四、菜单设置
1、行号,SNS
行号
# TOC Button

toc:
#   use: choose whether the line_number of toc will show or not.
#       Available value of "linenumber": true | false
    linenumber: true
SNS
填上你的个人链接,如果不想显示,留空或前面加 # 号
# SNS Menu
sns:
    email: youremail@email.com #这个将显示在侧边栏头像下面
    facebook: "https://www.facebook.com/facebook"
    twitter: "https://twitter.com/twitter"
    googleplus: "https://www.google.com/"
    weibo:
    instagram:
    tumblr:
    github:
    linkedin:
    zhihu:
    bilibili:
    telegram:
    v2ex:
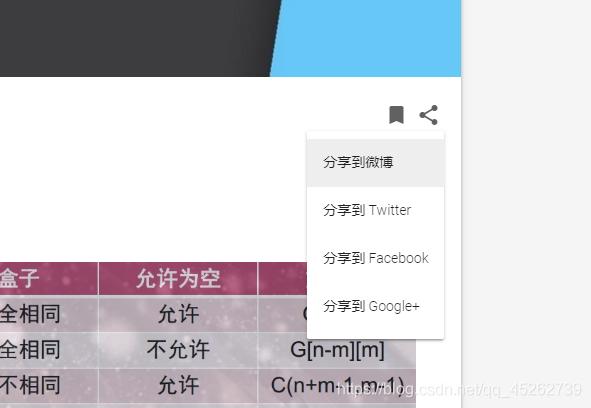
2、分享菜单
如果为 false 将不显示在分享菜单
# SNS Share Switch
sns_share:
    twitter: true
    facebook: true
    googleplus: true
    weibo: true
    linkedin: false
    qq: false
    telegram: false
3、侧边栏设置
# Sidebar Customize
sidebar:
    dropdown:
        Email Me:
            link: "mailto: scaryffy@gmail.com" #个人邮箱地址
            icon: email
    homepage: #主页
        use: true #是否启用
        icon: home #图标
        divider: false #下方是否添加分割线
    archives: #归档
        use: true
        icon: inbox
        divider: false
    categories: #分类
        use: false
        icon: chrome_reader_mode
        divider: false
    pages: #其他独立页面
        #About: #关于
            #link: "/about"
            #icon: person
            #divider: false
    article_num: #是否显示文章总数
        use: false
        divider: false
    footer: #侧边栏页脚显示作者及主题信息
        divider: true
        theme: true
        support: false
        feedback: false
        material: false
图标可以到 这里 选择你喜欢的替换
五、独立界面
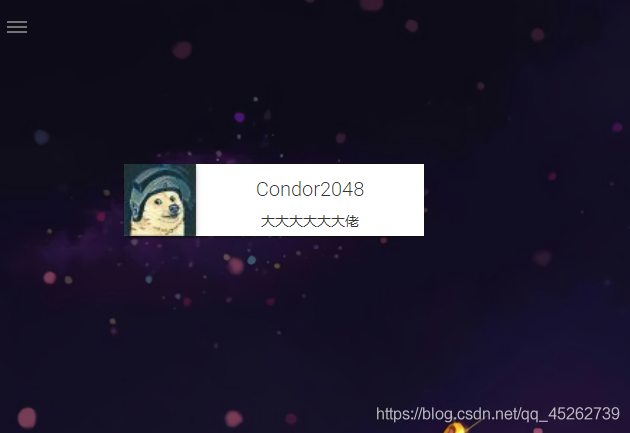
1、友情链接
侧边栏添加友链:
    pages: #其他独立页面
        #####
        友链:
            link: "/links"
            icon: face
            divider: false
        #####
        About: #关于
            link: "/about"
            icon: person
            divider: false
回到博客根目录,打开终端,输入:
$ hexo new page "links"
进入博客根目录 source/links 文件夹,打开 index.md 文件,改为:
---
title: links
date: 2018-10-23 08:52:56
layout: links
---
同样在根目录下 source 文件下创建 _data 文件夹(不可使用其他名字),在 _data 下创建 links.yml 文件,打开修改,格式为:
Name: # Name 替换为名字
    link: http://example.com #链接
    avatar: http://example.com/avatar.png #头像
    descr: "这是一个描述" #描述
例子:
Condor2048:
    link: https://skylayer.pro/
    avatar: http://qlogo3.store.qq.com/qzone/1262500438/1262500438/50?1538278027
    descr: "大大大大大大佬"
添加多个友情链接,只需要根据上面的格式重复填写即可。
2、标签云
侧边栏添加标签云:
    pages: #其他独立页面
        友链:
            link: "/links"
            icon: face
            divider: false
        #####
        标签云:
            link: "/tags"
            icon: cloud_circle
            divider: false
        #####
        About: #关于
            link: "/about"
            icon: person
            divider: false
回到博客根目录,打开终端,输入:
$ hexo new page "tags"
进入博客根目录 source/tags 文件夹,打开 index.md 文件,改为:
---
title: tags
date: 2018-10-23 08:52:56
layout: tags
---

3、图库
侧边栏添加图库:
    pages: #其他独立页面
        友链:
            link: "/links"
            icon: face
            divider: false
        标签云:
            link: "/tags"
            icon: cloud_circle
            divider: false
        #####
        图库:
            link: "/gallery"
            icon: cloud_circle
            divider: false
        #####
        About: #关于
            link: "/about"
            icon: person
            divider: false
回到博客根目录,打开终端,输入:
$ hexo new page "gallery"
进入博客根目录 source/gallery 文件夹,打开 index.md 文件,改为:
---
title: gallery
date: 2018-10-23 08:52:56
layout: gallery
---
同样在根目录下 source/_data 文件下创建 gallery.yml 文件,打开修改,格式为:
Name: #名字
    full_link: http://example.com/full-image.png #链接
    thumb_link: http://example.com/thumb-image.png #链接
    descr: "这是一个描述" #描述
添加多张图片,只需要根据上面的格式重复填写即可。
六、评论系统
comment:
    use: # 你想使用的评论系统,可选有:disqus | disqus_click | changyan | livere | gitment | gitalk | valine

    # 使用 Disqus,将 comment: use: 字段设置为 disqus 或 disqus_click。
    # 使用 Disqus_Click 时,文章页面里按下按钮才加载 Disqus 评论。
    shortname: example # 填入你的 Disqus shortname 。
    # 此处的 shortname 不是你的登录的 id,是你的评论二级域名去掉 .duoshuo.com 或 .disqus.com 部分
    # 例如:Disqus 域名 example.disqus.com

    # 使用 畅言,将 comment: use: 字段设置为 changyan。
    changyan_appid: # 畅言的 APPID
    changyan_conf: # 畅言的 CONF
    changyan_thread_key_type: path # 用于设置畅言的 tread key,默认为 path。

    # 使用 来必力,将 comment: use: 字段设置为 livere。
    # Material 主题内置的来必力是 city_verision
    livere_data_uid: # 打开来必力后台,找到 “获取代码”,在 Web 代码中,找到 data-uid,填入此处

    # 使用 Gitment,将 comment: use: 字段设置为 gitment。
    gitment_repo:   # git repo of the hexo
    gitment_owner:  # git repo's owner
    gitment_client_id:  # github app client id
    gitment_client_secret :  # github app client secret

    # 使用 Valine,将 comment:use:字段设置为 valine。
    # Valine 是一款基于 Leancloud 的 sdk 开发的评论系统。
    valine_leancloud_appId:  # Leancloud 的 APPID
    valine_leancloud_appKey:  # Leancloud 的 APPKey
    valine_notify: true # Valine 的评论邮件提醒功能 true | false。参见 https://github.com/xCss/Valine/wiki
    valine_verify: false # valine 验证码服务 (true/false)
    valine_pageSize: 10 # 评论列表分页,每页条数。
    valine_avatar:  # Gravatar 头像展示方式。参见 https://valine.js.org/avatar.html
    valine_lang: zh-cn # 多语言支持,可选 zh-cn | en,可自定义,参见 https://valine.js.org/i18n.html。
    valine_placeholder: ヾノ≧∀≦)o来啊,快活啊! # 没有评论时评论框显示的提示语
    valine_guest_info: nick,mail,link #valine comment header info

    # 使用 Gitalk,将 comment:use:字段设置为 gitalk。
    # Gitalk 和 Gitment 一样都是一个基于 GitHub Issue 的评论系统。在完成 GitHub Oauth App 的申请并获取 key 后,在主题配置文件中填入 gitalk_repo gitalk_owner gitalk_client_id gitalk_client_secret 参数即可。
    gitalk_repo: # git repo of the hexo
    gitalk_owner: # git repo's owner
    gitalk_client_id: # github app client id
    gitalk_client_secret: # github app client secret
各评论系统的参考文档:
七、搜索系统
# Search Systems
# Available value:
#     swiftype | google | local
search:
    use: local # 可选 swiftype | google | local。
    swiftype_key:
1、Google
将 search:字段改为 google,调用 Google 搜索引擎对您的站点进行搜索。
2、本地搜索
将 search:字段改为 local。
回到博客根目录,右键打开 Git Back Here,输入:
$ npm install hexo-generator-search --save
安装 ‘hexo-generator-search’ 插件
打开’根 _config.yml’ 文件添加:
search:
    path: search.xml # 文件路径
    field: post # 文件的搜索范围,可选:
    # post 仅涵盖您博客的所有帖子。
    # psge 仅涵盖博客的所有页面。
    # all 涵盖您博客的所有帖子和页面。
3、Swiftype
将 search:字段改为 swiftype。并填入 swiftype_key
注册 Swiftype,在你的 Swiftype Install Code 中,有这么一行代码 _st(‘install’,’*‘,’2.0.0’); 。其中 * 即为 swiftype_key
八、统计系统
# Available value:
#     baidu | google | cnzz
analytics: # 用于设置访客分析服务,支持 Google Analysis 、百度站长工具和 CNZZ。
    google_site_id:
    baidu_site_id:
    cnzz_site_id:
1、百度统计
登录 百度统计,在站点的代码获取页面复制 ` 后面那串统计脚本 id,填入baidu_site_id。
2、Google 分析
在 google_site_id 字段填入你的 Google 跟踪 ID。跟踪 ID 通常是以 UA- 开头。
3、CNZZ
在 cnzz_site_id填入 CNZZ 提供的统计的站点 ID。 这个 ID 可以在地址栏里,或者自动生成的脚本里面找到。
在 CNZZ 提供的统计代码中,z_stat.php?id= 后和 &web_id= 各有一串字符,它们应该是相同的。将这串字符填入 site_id。
为避免影响美观,Material 主题使用 display: none;隐藏了“站长统计”几个字。
4、其他统计服务
确保上述配置的字段为空,然后在在 head.yml 中填入你的统计服务代码。
九、PV&UV 统计
PV:page view,网站浏览量
UV:unique visitor,独立访客数
1、LeanCloud
# Leancloud Views
leancloud:
    enable: false # 是否开启
    app_id: #你的 app_id
    app_key: #你的 app_key
    av_core_mini: "https://cdn1.lncld.net/static/js/av-core-mini-0.6.1.js"
注册 LeanCloud,进入控制台:
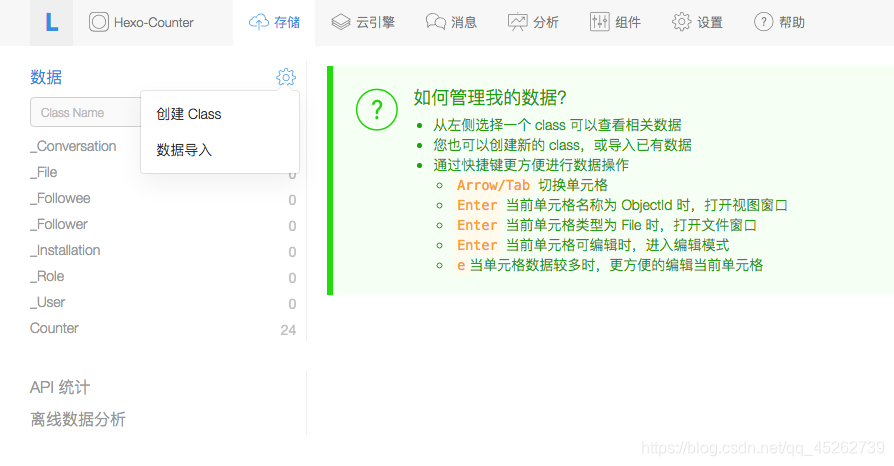
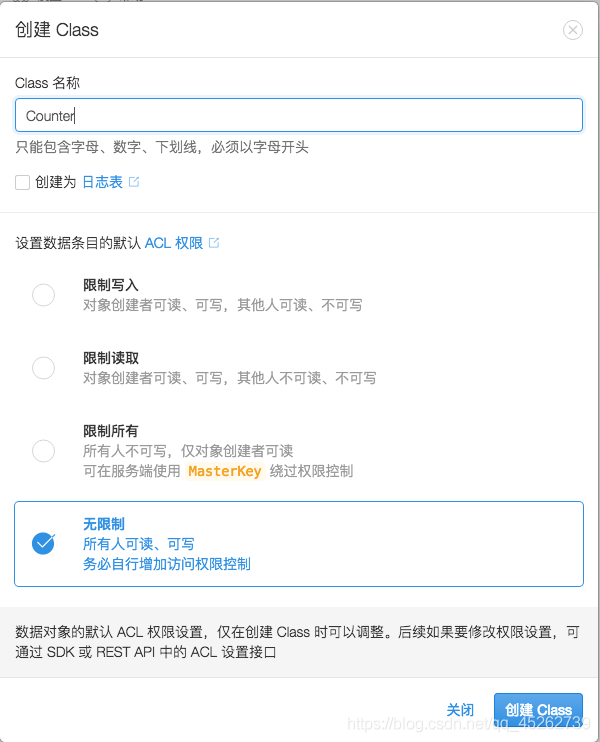
创建一个新应用(默认类型为JavaScript SDK),点击应用进入;
创建名称为 Counter 的 Class 注意:ACL 权限 必须为 无限制:
将 应用->设置->应用 Key 中的 APP ID 与 APP Key 填入’主题 _config.yml ‘文件中
为了保证应用的统计计数功能仅应用于自己的博客系统,你可以在 应用->设置->安全中心 的Web安全域名中加入自己的博客域名,以保证数据的调用安全。
2、不蒜子
# Busuanzi 不蒜子 Views
busuanzi:
    enable: false # 是否开启
    all_site_uv: false # 可统计全站的独立访客人数,即可在 blog_info 模块的 Menu 菜单中看到。
    post_pv: false #  统计每篇文章的页面浏览次数,在文章页的 分享按钮 菜单中可看到。
    busuanzi_pure_mini_js: "https://dn-lbstatics.qbox.me/busuanzi/2.3/busuanzi.pure.mini.js"
使用 不蒜子 浏览次数统计,仅需将 busuanzi: enable: 设置为 true。
十、第三方库
Material 主题引用了下述第三方库,你可以使用公共 CDN 库加载它们:
# Third party library
#   You can load these files from public cdn.
#   For example
#       jquery: https://cdn.bootcss.com/jquery/2.2.1/jquery.js
    # jQuery 2.2.0
    # 一个JavaScript 库
    jquery:

    # nprogress 0.2.0
    # 进度条
    nprogress:

    # FontAwesome 4.5.0
    fontawesome:

    # MathJax 2.7.0-2.7.1
    # LaTeX 数学公式
    mathjax: https://cdn.bootcss.com/mathjax/2.7.0/MathJax.js

    # Prettify r298 (only prettify.js)
    # Prettify 语法高亮自定义 JS 文件
    prettify:

    # Material Icons 3.0.1
    # Material 图标
    material_icons:
更多功能请参考 EasyHexo 插件使用与配置
参考文章 Material Theme
附录
主题 _config.yml 1.5.2 版文件:
# ---------------------------------------------------------------
# Site Information Settings
# ---------------------------------------------------------------

# Head info
head:
    favicon: "/img/favicon.png"
    high_res_favicon: "/img/favicon.png"
    apple_touch_icon: "/img/favicon.png"
    keywords:
    site_verification:
        google:
        baidu:

    # Enable generate structured-data as JSON+LD for SEO or not.
    #    Set as 'false' if it cause some wrong when `hexo g`.
    structured_data: true

# Jump Links Settings
url:
    rss:
    daily_pic: "#"
    logo: "#"


# ---------------------------------------------------------------
# Style Settings
# ---------------------------------------------------------------

# Schemes
scheme: Paradox
#scheme: Isolation

# UI & UX: slogan, color, effect
uiux:
    slogan: "Hi, nice to meet you"
    theme_color: "#0097A7"
    theme_sub_color: "#00838F"
    hyperlink_color: "#00838F"
    button_color: "#757575"
    android_chrome_color: "#0097A7"
    nprogress_color: "#29d"
    nprogress_buffer: "800"

# JS Effect Switches
js_effect:
    fade: true
    smoothscroll: false

# Reading experience
reading:
    entry_excerpt: 80

# Thumbnail Settings
thumbnail:
    purecolor:
    random_amount: 19

# Background Settings
# bing available parameter:
#    new | color= | type=
#        color available value: black, blue, brown, green, multi, orange, pink, purple, red, white, yellow
#        type available value: A (animal), C (culture), N (nature), S (space), T (travel)
background:
    purecolor: "#F5F5F5"
    #bgimg: "/img/bg.png"
    bing:
        enable: false
        parameter:

# Images Settings
img:
    logo: "/img/logo.png"
    avatar: "/img/avatar.png"
    daily_pic: "/img/daily_pic.png"
    sidebar_header: "/img/sidebar_header.png"
    random_thumbnail: "/img/random/material-"
    footer_image:
        #upyun_logo:
            #link: "https://www.upyun.com/"
            #src: "/img/upyun_logo.svg"

# Custom Fonts
#    family: the font-family which will be used in the theme
#    use: uri of fonts host.
#        Available value: google | baomitu | ustc | custom | catnet
#        - When you set as 'custom', you should fill in the value of 'custom_font_host', which should be a mirror of google fonts.
#        - If you have setup your custom font-family, don't forget to add style tag with @font-face or link.tag with font css
#          to /source/data/head.yml as custom code, to load custom font files.
fonts:
    family: Roboto, "Helvetica Neue", Helvetica, "PingFang SC", "Hiragino Sans GB", "Microsoft YaHei", "微软雅黑", Arial, sans-serif
    use: google
    custom_font_host:

# Card Elevation Level
card_elevation: 2

# Copyright
# Specify the date when the site was setup.
#    For example, if you set it as 2015, then footer will show '© 2015 - 2017'
copyright_since:

# Footer Text
# You can specify the text you want to show in footer, HTML tag is supported.
#   For example, you can setup ICP license number as:
#       '<a href="http://www.miitbeian.gov.cn" rel="nofollow">某ICP备xxxxxxxx号-x</a>'
footer_text:

# Qrcode for redirect at other device
#    use: choose which method to generate the qrcode for each posts.
#        Available value: plugin | online
#            - When use "plugin", you need to install the hexo-helper-qrcode.
#            - When use "online", the qrcode will be generated by 'pan.baidu.com' in China.
qrcode:
    enable: false
    use: plugin

# Code highlight
# You can only enable one of them to avoid issues.
# Also you need to disable highlight option in hexo's _config.yml.
#
#    Prettify
#        theme: # Available value in /source/css/prettify/[theme].min.css
prettify:
    enable: false
    theme: "github-v2"

#    Hanabi (https://github.com/egoist/hanabi)
#        line_number: [true/false] # Show line number for code block
#        includeDefaultColors: [true/false] # Use default hanabi colors
#        customColors: This value accept a string or am array to setting for hanabi colors.
#                    - If `includeDefaultColors` is true, this will append colors to the color pool
#                    - If `includeDefaultColors` is false, this will instead default color pool
hanabi:
    enable: false
    line_number: true
    includeDefaultColors: true
    customColors:

# Post License
# You can specify the text you want to show in the end of your posts and pages, HTML tag is supported.
#   For example, you can setup a CC license as:
#       'This blog is under a <a href="/creativecommons.html" target="_blank">CC BY-NC-SA 3.0 Unported License</a>'
# You can also use Front-Matter `license` to override this setting.
license:

# ---------------------------------------------------------------
# Menu Settings
# ---------------------------------------------------------------

# TOC Button

toc:
#   use: choose whether the line_number of toc will show or not.
#       Available value of "linenumber": true | false
    linenumber: true

# SNS Menu
sns:
    email: youremail@email.com
    facebook: "https://www.facebook.com/facebook"
    twitter: "https://twitter.com/twitter"
    googleplus: "https://www.google.com/"
    weibo:
    instagram:
    tumblr:
    github:
    linkedin:
    zhihu:
    bilibili:
    telegram:
    v2ex:

# SNS Share Switch
sns_share:
    twitter: true
    facebook: true
    googleplus: true
    weibo: true
    linkedin: false
    qq: false
    telegram: false

# Sidebar Customize
sidebar:
    dropdown:
        Email Me:
            link: "#"
            icon: email
    homepage:
        use: true
        icon: home
        divider: false
    archives:
        use: true
        icon: inbox
        divider: false
    categories:
        use: false
        icon: chrome_reader_mode
        divider: false
    pages:
        #About:
            #link: "/about"
            #icon: person
            #divider: false
    article_num:
        use: false
        divider: false
    footer:
        divider: true
        theme: true
        support: false
        feedback: false
        material: false


# ---------------------------------------------------------------
# Integrated Services
# ---------------------------------------------------------------

# Comment Systems
# Available value of "use":
#     disqus | disqus_click | changyan | livere | gitment | gitalk | valine
# If you want to use gitment or gitalk,you should get the client_id and client_secret form https://github.com/settings/applications/new
# If you want to use valine,you should get the app_id and app_key form https://leancloud.cn ,more setting please see https://valine.js.org
comment:
    use:
    shortname: # duoshuo or disqus shortname
    changyan_appid:
    changyan_conf:
    changyan_thread_key_type: path
    livere_data_uid:
    gitment_repo:   # git repo of the hexo
    gitment_owner:  # git repo's owner
    gitment_client_id:  # github app client id
    gitment_client_secret :  # github app client secret
    valine_leancloud_appId:  # leancloud application app id
    valine_leancloud_appKey:  # leancloud application app key
    valine_notify: false # valine mail notify (true/false) https://github.com/xCss/Valine/wiki
    valine_verify: false # valine verify code (true/false)
    valine_pageSize: 10 # comment list page size
    valine_avatar: identicon # gravatar style https://valine.js.org/#/avatar
    valine_lang: zh-cn # i18n
    valine_placeholder: Just go go # valine comment input placeholder(like: Please leave your footprints )
    valine_guest_info: nick,mail,link #valine comment header info
    gitalk_repo: # git repo of the hexo
    gitalk_owner: # git repo's owner
    gitalk_client_id: # github app client id
    gitalk_client_secret: # github app client secret

# Search Systems
# Available value:
#     swiftype | google | local
search:
    use: google
    swiftype_key:

# Analytics Systems
# Available value:
#     baidu | google | cnzz
analytics:
    google_site_id:
    baidu_site_id:
    cnzz_site_id:

# Leancloud Views
leancloud:
    enable: false
    app_id: #你的 app_id
    app_key: #你的 app_key
    av_core_mini: "https://cdn1.lncld.net/static/js/av-core-mini-0.6.1.js"

# Busuanzi 不蒜子 Views
busuanzi:
    enable: false
    all_site_uv: false
    post_pv: false
    busuanzi_pure_mini_js: "https://dn-lbstatics.qbox.me/busuanzi/2.3/busuanzi.pure.mini.js"

# Files Vendors
# Set a CDN for the files src you want to customize. The url should with protocol.
# Default(empty) will load the files from the origin server.
vendors:
# MaterialCDN
#   You can load theme unique files from your private cdn or oss.
#   The new src will have the base domain you configured below.
#   For example
#       materialcdn: https://cdn.jsdelivr.net/npm/hexo-material@1.4.0/source
    materialcdn:

# Third party library
#   You can load these files from public cdn.
#   For example
#       jquery: https://cdn.bootcss.com/jquery/2.2.1/jquery.js
    # jQuery 2.2.0
    jquery:
    # nprogress 0.2.0
    nprogress:
    # FontAwesome 4.5.0
    fontawesome:
    # MathJax 2.7.0-2.7.1
    mathjax:
    # Prettify r298 (only prettify.js)
    prettify:
    # Material Icons 3.0.1
    material_icons:

 enable: false
    app_id: #你的 app_id
    app_key: #你的 app_key
    av_core_mini: "https://cdn1.lncld.net/static/js/av-core-mini-0.6.1.js"

# Busuanzi 不蒜子 Views
busuanzi:
    enable: false
    all_site_uv: false
    post_pv: false
    busuanzi_pure_mini_js: "https://dn-lbstatics.qbox.me/busuanzi/2.3/busuanzi.pure.mini.js"

# Files Vendors
# Set a CDN for the files src you want to customize. The url should with protocol.
# Default(empty) will load the files from the origin server.
vendors:
# MaterialCDN
#   You can load theme unique files from your private cdn or oss.
#   The new src will have the base domain you configured below.
#   For example
#       materialcdn: https://cdn.jsdelivr.net/npm/hexo-material@1.4.0/source
    materialcdn:

# Third party library
#   You can load these files from public cdn.
#   For example
#       jquery: https://cdn.bootcss.com/jquery/2.2.1/jquery.js
    # jQuery 2.2.0
    jquery:
    # nprogress 0.2.0
    nprogress:
    # FontAwesome 4.5.0
    fontawesome:
    # MathJax 2.7.0-2.7.1
    mathjax:
    # Prettify r298 (only prettify.js)
    prettify:
    # Material Icons 3.0.1
    material_icons: